


» Home Electrical Wiring
» Electrical Wiring Directory
» Wire a Ceiling Fan
» Need Electrical Help? Ask the Electrician
» Wire a Ceiling Fan
» Need Electrical Help? Ask the Electrician
Install a Ceiling Fan Remote Control Module

|
By Dave Rongey
Summary: This ceiling fan remote control kits is installed with a typical cradle bracket assembly where the remote module is inserted into the cradle which will be covered by the ceiling fan canopy. © By: Dave Rongey |
How to Install a Ceiling Fan Remote Control Module
Down Rod Type Remote Control Ceiling Fans.
Down rod ceiling fans are most popular because of their ability to be installed in areas where there are high open ceilings.
Extension rods may be used from 4 inches to several feet. This enables the fan location to be at the ideal height location of between 7 to 9 feet from the floor.
Because down rod ceiling fans have a unique cradle bracket assembly, the following pictures provide focused step by step information that will assist you with the installation of the remote control fan module and the wiring process.
Electrical Wiring for a Remote Control Ceiling Fan - Part 4Step By Step Installation for remote control ceiling fans with a cradle bracket assembly. |
|
 |
This ceiling fan has a stem and ball type assembly which will mount inside this cradle bracket. |
 |
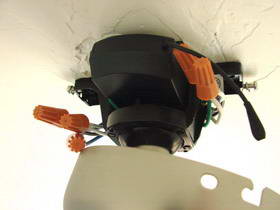
Once the ceiling fan assembly has been placed into the cradle bracket there is enough room above the pivot ball to insert the remote control receiver module. |
 |
Observe that the electrical wiring from the ceiling and the leads of the remote control module should be at the same end which makes it easier to identify the wire labels and is more convenient for installing the wire connectors. |
 |
Any unnecessary wire lengths are trimmed off of the wire coming down from the ceiling electrical junction box, then the wire connectors are installed. |
 |
Folding the connected wires neatly to the side will prevent them from interfering when the ceiling canopy is put into place. Zip-ties can be used to help bundle the leads together if necessary. |
 |
With the ceiling fan canopy in place I am ready to mount the ceiling fan light kit. |

|


