


Additional ResourcesRemote Control Ceiling Fan Instruction Manual |
|
A ceiling fan remote control is a convenient option for operating for any ceiling fan. Here is the Detailed Remote Control Instruction Manual [PDF] You will need Adobe® Acrobat® Reader to view PDF documents. |
» Home Electrical Wiring
» Electrical Wiring Directory
» Wire a Ceiling Fan
» Need Electrical Help? Ask the Electrician
» Wire a Ceiling Fan
» Need Electrical Help? Ask the Electrician
How to Installing a Ceiling Fan Remote Control

|
By Dave Rongey
Summary: Identifying the ceiling fan remote control frequency switch locations and settings with step-by-step photos and instructions. © By: Dave Rongey |
Install the Ceiling Fan Remote Control
Ceiling Fan Hand Remote and Module.
This page shows the two necessary control modules modules that are used to operate most remote control ceiling fans.
These photos show the actual locations of the dip switches that must be set alike for operation. The hand held remote control has these switches protected in the battery compartment where they are easily accessed.
These switches are very small and if the settings need to be changed it is best to use a tooth pick to make any adjustments. Only one switch needs to be changed for the address to be different
Electrical Wiring for a Remote Control Ceiling Fan - Part 1Step By Step identification of ceiling fan remote control frequency switch locations |
|
 |
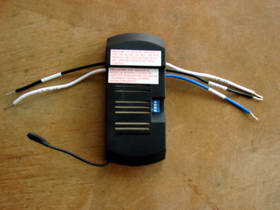
This set of remote controls consists of the white hand held transmitter that sends signals to the black receiver module which gets installed up inside the ceiling fan canopy area. |
 |
Both of these remote control components have a set of four switches that need to have the same settings. The setting determines the frequency that will be used to control the ceiling fan. The hand held remote switches can be accessed by removing the battery. |
 |
This is a close up view of the four switches located in the hand held battery compartment. These switches, also known as Dip Switches, will either be a rocker type switch which are pressed at either end to change the setting or the switch will have a raised area such as shown here. These switches can be pushed back and forth to change the setting. Notice that one side is labeled as ON. This will help identify the orientation of the switches and settings. |
 |
This receiver module has the set of four switches conveniently located for easy adjustment before the installation and wiring takes place. |
 |
Once the setting has been made, install the 9 Volt battery and this part is completed. |
 |
Now the remote control receiver module is ready for installation up at the ceiling fan mounting bracket where it attaches to the approved ceiling fan electrical junction box. |

|


