Additional ResourcesHampton Bay Ceiling Fan Installation Manuals |
|
A remote control module can be installed on most ceiling fans. Here are the Specifications for a Hampton Bay Hugger Ceiling Fan [PDF]
You will need Adobe® Acrobat® Reader to view PDF documents. |
How to Wire a Ceiling Fan Remote Control Unit

|
By Dave Rongey
Summary: This ceiling fan remote control kit is installed into a hugger ceiling fan assembly. © By: Dave Rongey |
Wiring the Ceiling Fan Remote Control Module
Hugger Type Remote Control Ceiling Fans.
Hugger ceiling fans are most popular because they enable ceiling fan to be installed in low ceiling locations and maintain the safe clearance level of at least 7 feet to the ceiling fan blades.
Even with the close proximity to the ceiling, the hugger ceiling fan will provide good air flow and ventilation which can help reduce energy bills, weather the season is hot or cold with the help of the remote control ceiling fan functions.
Electrical Wiring for a Remote Control Ceiling Fan - Part 3Step By Step Installation for remote control ceiling fans with the hugger style enclosure. |
|
 |
This remote control ceiling fan switch will replace the existing light switch. Notice that the Dip Switches can be accessed through an opening on the side of this remote switch. |
 |
This photo shows the contents that came with this remote control kit which can be installed with a new ceiling fan or added to an existing ceiling fan that does not already have remote control capabilities. |
 |
This Hugger type of ceiling fan has a different style of mounting bracket which needs to be examined to determine the right area to install the ceiling fan remote control module. |
 |
The mounting bracket is installed onto an approved ceiling fan box which was previously installed. Notice that the electrical wiring is brought out on one side where the control module will be installed. This keeps the center area open for the ceiling fan assembly to be mounted in place. |
 |
The ceiling fan assembly has hardware that securely locks the stem of the ceiling fan into place. |
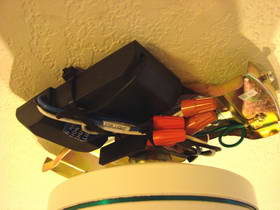 |
The ceiling fan module has been wired and is now attached to the bracket using zip-ties which also holds the wires and connectors in place so they do not interfere when the fan motor housing is installed. |
 |
This hugger ceiling fan is now ready to have the fan blades installed and then the light fixture. |
|