


Automotive Electrical Radio Wiring

|
By Dave Rongey
Summary: How to install wiring for a car stereo and understand all the speaker wiring colors. |
Electrical Wiring a Radio and Car Stereo - Speakers and Power |
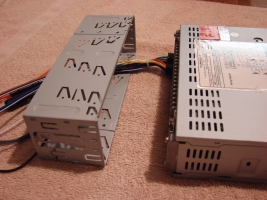
| Lets take a look at auto electrical car stereo wiring and installing a radio into your car.
Here's the scenario: My son, Matthew, is at the University getting ready to come home for the summer. While at college he bought another car that would be more fuel efficient and more hi way dependable. Back home he and I share his Toyota 4-Wheel Drive truck which comes in handy when we get an occasional snow. Often I'll use the Toyota truck to work in remote areas where my utility truck would get stuck.We will be looking at auto electrical car stereo wiring for his new Honda. |
So here we go - Matthew's Honda car needs the radio from the Toyota, so through phone calls and emails we've been able to get everything we need to help Matthew install auto electrical car stereo wiring for his radio. I thought this would be a great way to assist you with your Car Radio Project.
Typical Wiring HarnessHere are the connections you'll need to identify for your car.
Tip - I had Matthew Google for the wiring configuration for his Honda car because we didn't know what all the wires were so we decided this would be a great way to show how to perform auto electrical car stereo wiring. Sure - we could have used a tester to help us, but why not use the information if it is available, and it was. Matthew found a Great Web site that provided the information we needed.
You can get there using this link http://www.installdr.com/QuickWiring.htmlBasically, you'll need to identify each pair of speakers.
Typically your car will have Four Speakers:
FRONT - Left / Right
REAR - Left / Right
Some trucks may only have the front speakers.
For each speaker you will have a pair of wires. Usually the colors will be the same except one will have a stripe on the insulation which usually goes to the Negative Terminal. Be sure to consult your particular auto electrical car stereo wiring diagram.
* PLEASE NOTE This discussion is limited to this particular car and its radio. Your car and radio might be different. Verify the exact wiring for your application requirements.
Wiring Table
What The Wire Goes To
|
1994 Honda - Factory Wiring
|
Old Radio Connector
|
New Radio Wires |
|---|---|---|---|
Ground |
Black |
Black |
Black |
+12 Volt Battery Wire |
White w/ Yellow or Blue Stripe |
Yellow |
|
+12 Volt Ignition Wire |
Yellow w/ Red Stripe |
Red |
Red |
Dash Light Dimmer Wire |
White (?) |
||
Power Antenna Trigger |
Brown w/ White Stripe |
Orange |
|
Front - Left Speaker - (+) |
Blue w/ Green Stripe |
White |
Green |
Front - Left Speaker - (-) |
Gray w/ Black Stripe |
White w/ Stripe |
Green w/ Stripe |
Front - Right Speaker - (+) |
Red w/ Green Stripe |
Gray |
Gray |
Front - Right Speaker - (-) |
Brown w/ Black Stripe |
Gray w/ Stripe |
Gray w/ Stripe |
Rear - Left Speaker - (+) |
Blue w/ Yellow Stripe |
Green |
Brown |
Rear - Left Speaker - (-) |
Gray w/ White Stripe |
Green w/ Stripe |
Brown w/ Stripe |
Rear - Right Speaker - (+) |
Red w/ Yellow Stripe |
Purple |
Blue |
Rear - Right Speaker - (-) |
Brown w/ White Stripe |
Purple w/ Stripe |
Blue w/ Stripe |
Wiring the new radio to the existing wiring harness
 |
This is the New Radio Wiring Diagram showing the connector as it attaches to the rear of the radio. |
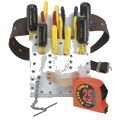
Some small gray or blue wire nuts, or wire crimps will help make your splices. I also sent a wire stripper and a small screw driver to help with the installation process for this auto electrical car stereo wiring project .
|
|
The speaker wires look to be about 22 or 24 gauge. When using the wire nuts make sure to strip the wires evenly and twist the wires together. Don't make the bare wires too long, you don't want any exposed wire outside of the wire nut otherwise the wires could short out and cause auto electrical car stereo wiring problems.
|
|
The wires are well labeled.
|
|
You can remove the wire harness and connector assembly from the back of the radio while you make your auto electrical car stereo wiring splices.
|


Installation of the Radio Frame
 |
The Radio and the mounting frame.
|
 |
The radio frame removed from the radio.
|
 |
Frame installation tabs will be used to hold the radio into position in the dashboard.
|
 |
When the frame is installed into the radio cavity of the dashboard you will be able to bend some of these tabs up into areas behind the molding of the dashboard to secure the frame into place. You could use your fingers or the small screw driver to help you do this.
|
 |
With all the splices made on the wire harness and the antenna cable inserted you will be able to slide the radio into the dashboard frame.
|
 |
Do not install the radio until you are all ready.
Once the radio is slid into place these locking tabs on the side
will latch and you will not be able to remove the radio unless you
have the pair of "keys". If you don't have the keys you'll
have a tough time trying to get the radio back out, so make sure
you are ready!
|
New Radio Features
 |
These new radios have some great new features that can be easily configured into your auto electrical car stereo wiring installation .
|
 |
A handy USB Port will allow you to play your
MP3s from your memory stick, or I guess you could listen to your
Quick Books backups just for kicks - not!
|
 |
Ok, so you get bored listening to 300 songs
on the USB stick, no problem - plug in your iPod and listen to 5000
more tunes - or maybe even an audio text book for your upcoming
classes next year - Hey, its never too early - Right?
|
 |
The AUX jack on the front of the radio is really handy. Hey - if you have a 21 inch flat screen in the passenger seat, you can always just plug that dude in and have surround sound. What? - you don't have a 120 volt adapter in the car yet? I guess we'll have to post a new article about auto electrical car stereo wiring for a 120 volt AC adapter.
|
 |
You can get these AUX (auxiliary Input) cables from Radio Shack or your local electronics store for auto electrical car stereo wiring parts. You can also plug in any other audio device, the radio doesn't know the difference - its just an "Input". I suppose you can plug your cell phone into the radio if you have the right kind of jack - then you can listen to Uncle Tommy all the way home - that will keep you awake - Right?
|
More about Automotive Wiring
Learn more about Automotive Electrical |
This has been a project about automotive electrical for wiring a car stereo.
|
|||||||


Recent Testimonials
I think your site offers the the clearest and best electrical information for homeowners I have ever seen on the net.You have given me confidence to do my own projects which I never had before. THANK YOU!
Paul, from Foxboro, Massachusetts
I wish I found this site earlier, it is by far the best electrical related resource I have found on the web.
George, from Scranton, Pennsylvania
I love this site for an office worker that does not know anything about electric wiring.
Bill, from New York City, New York
This site is so much better than the 3 books I just bought, I wish I came here first.
Collin, from Grand Rapids, Michigan
Thank you for answering my question.
I was able to get this done. This site is perfect. I am glad I found it. Please keep it going.
Mike, from Chicago, Illinois
Read more Comments
Leave a Comment