


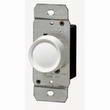
How to Replace a 3 Way Switch with a 3 Way Dimmer Switch

|
How to Wire 3Way Dimmer Switches: Common 3Way Dimmer Switch Wire Connections and Light Level Adjustments, Wiring Two 3Way Dimmer Switches. © By: Dave Rongey |
Guide for Wiring a 3 Way Dimmer Switch
Electrical Question: I replaced the switch that we use most often with a dimmer switch. Now the switch that does not have the dimmer has to be on in order for the dimmer switch to work.
- I just bought a house that has 2 switches that control my living room light.
- I replaced the switch that we use most often with a dimmer switch.
- Now the switch that does not have the dimmer has to be on in order for the dimmer switch to work.
- When the lights are on they make a buzzing noise that they did not make before with the normal switch. Now, both the old switch and the dimmer switch have 3 posts.
- Looking toward the switch the top right has the black wire, bottom right has white wire, and left side has a red wire (on the dimmer switch).
- I just took the wires off the old switch and put them on the dimmer switch just the way they were. Did I do something wrong?
- The light works and dims but both switches have to be On, and now the On position is when the dimmer switch is down. The dimmer switch has a sliding control.
Thanks!
This electrical wiring question came from: Robert, a Homeowner from Gloucester, Virginia.
Dave’s Reply:
Thanks for your electric wiring question Robert.
How to Wire a 3Way Dimmer Switch
Application: Wiring for a 3Way Dimmer Switch.
Skill Level: Beginner to Intermediate. This electrical work is best performed by a Licensed Electrical Contractor.
Tools Required: Basic Electricians Pouch Hand Tools and Voltage Tester.
Estimated Time: Depends on personal level experience and ability to work with tools.
Precaution: Identify the lighting circuit, turn it OFF and Tag it with a Note before wiring the new dimmer.
3Way Dimmer Switch Wire Connections
- Wiring Two 3Way Dimmer Switches
- This is a relatively easy fix where the wiring at the dimmer switch is out of sequence, which can be caused by having a traveler wire connected to the point position.
- In this case simply swap the single point wire with one of the two traveler wires at the opposite end of the switch.
- NOTE: The Point Wire is commonly the Black Wire on a 3way Dimmer Switch, and the Black Screw on a 3Way Switch.
- Dimmer Switch Wiring Connections
- The wiring may be corrected by identifying the point wire or the pair used for travelers and correcting the connections, which are shown in the 3 way dimmer switch wiring diagrams available below.
- Dimmer Switches Can Cause Lamps to Buzz
- The buzzing that you hear when using the dimmer switch is coming from the filament inside the lamps which is vibrating at the lower control settings of the 3-way dimmer switch.
- Adjusting the Light Level of the Dimmer Switch
- Most dimmer switches have a small adjustment which is located on the top area of the switch, close to the mounting bracket.
- The cover plate will need to be removed to have access to the adjustment screw on the dimmer switch. Using a small screw driver, make the adjustment so the lights are barely on when the dimmer switch is in the lowest setting.
- This adjustment will allow the dimmer switch to operate to the lowest setting and have full range of the dimmer switch.
More about Wiring a 3Way Dimmer Switch
Wiring a switch

Wiring a Light Switch – Diagram 1
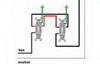
- 3 Way Dimmer Switch Wiring Diagram
- Fully explained 3 way dimmer switch wiring diagram will take the mystery out of wiring a 3-way dimmer switch.
See More information about 3 Way Switch Diagram
3 Way Switch Diagram
- 3 Way Switch Diagram
- In response to the requests for this information, I have developed a comprehensive,step-by-step guide designed to walk you through the identification and wiring of your 3-way switches.
The following may also be helpful for you:
|
|

Be Careful and Be Safe - Never Work on Energized Circuits!
Consult your Local Building Department about Permits and Inspections for all Electric Wiring Projects.


More articles about Electrical and Home Electrical Wiring: |
|
| « Previous | Next » |
Adding Circuits to an Electrical Panel |
Wiring Methods for Adding Kitchen Circuits |


