 |
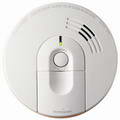
Take a look at a typical Smoke Detector installationAfter the circuit is identified and shut off the wires are capped off with wire connectors for an extra measure of safety. |
|
|---|---|---|
| A 3-wire romex is installed to each location linking the detectors together. The wire size must match the existing smoke detector. Even though most detectors do not require a ground, always install and bond the ground conductors together. |  |
 |
 |
 |
|
|
||
 |
 |
 |
|
||
 |
 |  |
|
||
 |
 |
 |
|
||
 |
The power is turned back on and the green power indicator LED lights up. To smoke detector is tested by pressing the test button until the alarm sounds. The alarm usually sounds once then sends the signal to the other smoke detectors causing them to all go into alarm for a short test period. |  |
* Not all smoke detectors are exactly alike, so be sure to carefully read the instruction sheet that came with your brand of smoke detectors. |
||
How to Add More Smoke Detectors
|
Summary: Adding smoke detectors to your home existing smoke detector system will help bring your home up to current codes while providing additional protection to your home and family and adding value to your home as well.
© By: Dave Rongey |
Adding 3-Wire Smoke Detectors to a 2-Wire System
The 2-Wire System - Older Homes Many homes still only have one 2-wire smoke detector usually found in the hallway leading to the bedrooms or a stairwell.
Adding additional smoke detectors in other required areas such as individual bedrooms while converting the original smoke detector is relatively easy, as shown in the installation photos shown below.
A typical construction project will require a smoke detector in each bedroom and on the ceiling or wall at a point centrally located in the area giving access to bedrooms such as hallways.
| Mount smoke detectors at least 4 inches from wall or on the wall with the top of the detector within 4 inches and 12 inches of the highest point of the ceiling. In multi-story units there shall be a detector at each level and shall be placed at the center of the ceiling 24 inches or more higher than the hall are required to have a smoke detector on the hall ceiling and in the bedroom. | In new construction when more than one smoke detector is required to be installed within an individual dwelling, the detectors shall be interconnected in such a manner that the actuation of one alarm will activate all of the alarms in the dwelling. Below you will see some photos of recent projects that I have selected to help you with your project. |
|
|
||||||||||

|