


How To Fix Your Light Switch Wiring
 '; ';
|
I replaced a switch and now the light turned on when the switch was turned off and the lights in the other room turned off. How to Fix Light Switch Wiring Problems. © By: Dave Rongey |
Wiring a Light Switch
[ad#block]Electrical Question: How can I determine the correct placement of the wires for a new switch?
Patrick, a Homeowner in Pennsylvania asks:
- There is only one light switch to control this light fixture.
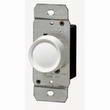
- I am replacing a normal toggle switch for a dining room chandelier with a dimmer switch.
- I read the instructions, marked the wire attached to the different colored screw of the original switch and then attached the new switch.
- There are three black wires and a ground coming out of the wall and attached to the original switch.
- The white wires were not attached to the switch and are capped.
- The home is only 5 months old.
- When I replaced the switch and tried it out, the light turned on when the switch was turned to the “off” position and the lights in the other room turned off.
How to Fix Common Mistakes When Wiring a Light Switch
Skill Level: Intermediate – Best performed by a Licensed Electrician.
Tools Required: Basic Electricians Pouch Hand Tools and Voltage Tester.
Estimated Time: Depends on personal level experience and ability to work with tools.
Precaution: Identify the circuit of the light fixture and switch, turn it OFF and Tag it with a Note before working with the wiring.
Notice: Installing additional fixture wiring should be done according to local and national electrical codes, however replacing a light switch does not require a permit in most locations.
Materials: Make sure the replacement light switch has the same amperage and voltage rating as the original switch, and is fully compatible with the electrical circuit, the light fixture and the type of light bulbs being used.
How to Fix Light Switch Wiring Problems
One Light Switch Controls a Light Fixture.
The key to solving light switch problems is to identify the wiring, especially the wire that is the source of power.
- In this project, the mistake is that the power that is traveling through to the other room is now being controlled by the switch, instead of the switch controlling the room light.
- The three black wires represent Power In, Power Out to the other room, and Power to the Light Fixture.
- It is best to identify each of the black wires using a voltage tester, however swapping the connections of the black wires to the switch will eventually create the right connection because there are only a few possible configurations.
- The key to solving light switch problems is always to identify the wiring, especially the wire that is the source of power.
Light Switch Wiring Diagrams and Instructions
How to Wire a Dimmer Switch
3 Way Dimmer Switch Wiring Diagram
Fully explained 3 way dimmer switch wiring diagram will take the mystery out of wiring a 3-way dimmer switch.
Light Switch Wiring

Wiring a Light Switch – Diagram 1
- Fully explained pictures and wiring diagrams about wiring light switches.
- Describing the most common switches starting with photo diagram 1.
How to Use Electrical Testers
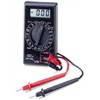
Electrical Safety and Voltage Testers
- When working on home electrical wiring, quality voltage testers can play an important part in electrical safety.
- Electrical testers enable you to identify electrical circuits and help prevent the possibility of accidental electrical shock.
The following may also be helpful for you:
Be Careful and Be Safe - Never Work on Energized Circuits!
Consult your Local Building Department about Permits and Inspections for all Electric Wiring Projects.
More articles about Dimmer Switch and Home Electrical Wiring: |
|
| « Previous | Next » |
Upgrading a Home Electrical Panel |
Rewiring Home Electrical Circuit Wiring |


